H.264 Encoding with the Hantro H1 Encoder in the NXP i.MX 8M Mini
The H.264 encoder implemented in the i.MX8M Mini SoC is the Hantro H1. The driver in the Linux kernel is hx280enc.c implements minimal functionality. The bulk of the functionality is provided by two libraries: imx-vpu-hantro and imx-vpuwrap.
By default, imx-vpuwrap defaults the encoder to Baseline profile. The encoder can do CABAC and 8×8 transform, from Main and High profiles respectively.
The code below shows how to enable those.
#if HIGH_PROFILE
config->eProfile = OMX_VIDEO_AVCProfileHigh;
config->eLevel = OMX_VIDEO_AVCLevel42;
#else
config->eProfile = OMX_VIDEO_AVCProfileBaseline;
config->eLevel = OMX_VIDEO_AVCLevel1;
#endif
...
#if HIGH_PROFILE
config->nRefFrames = 2;
#else
config->nRefFrames = 1;
#endif
...
#if HIGH_PROFILE
config->bEntropyCodingCABAC = OMX_TRUE;
#else
config->bEntropyCodingCABAC = OMX_FALSE;
#endif
...
#if HIGH_PROFILE
config->bDirect8x8Inference = OMX_TRUE;
#else
config->bDirect8x8Inference = OMX_FALSE;
#endif
...
#ifdef CONFORMANCE
#if HIGH_PROFILE
config->eLevel = OMX_VIDEO_AVCLevel42;
#else
config->eLevel = OMX_VIDEO_AVCLevel1;
#endif
config->bUseHadamard = OMX_TRUE;
#endif
Encoding the same sequence with those features enabled makes a modest improvement to the video quality.
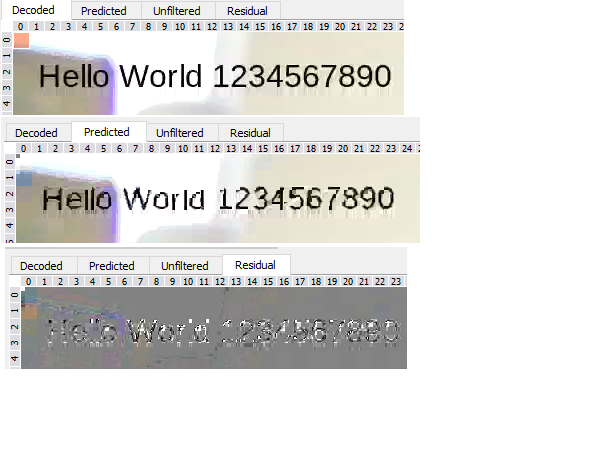
However, the quality of the video encoded with the H1 is not amazing. In my tests, I fixed the bitrate and let the encoder vary the Qp as we want to control the size of the file generated. The sequences captured show a lot of artefacts, particularly at low bitrate (5 and 10Mbps), but also still with bitrates above 20Mbps.
This is particularly visible around text as can be seen below. This is from a 1080p30 sequence captured with gop-size=15, quant=0, bitrate=5000.
The video quality was compared to the Vitec VMC7440 encoder which produced very clean images at the same bitrate. The comparison is likely unfair as the VMC7440 is a PCIe card and is not concerned with how much power it uses nor its physical size, whereas the H1 is embedded in a small, low-power i.MX8MMini and is problably a compromise between features and power usage.
When quizzed on the quality issue, NXP pointed us towards the i.MX8Plus, which uses a VC8000E encoder (H.264 and H.265) and stated that customers are experiening better video performance at lower bitrate.
Some useful resources about H.264:
Efficiently delete loads of files on Linux
Deleting loads of files (>10,000s) can be slow even if each file is small. Using rsync can be surprisingly fast:
mkdir empty_dir
rsync -a --delete empty_dir/    directory_to_delete/
U-Boot: Miscellaneous Notes
U-Boot is a bootloader designed to boot the Linux kernel.
bootargs: passed to kernel as boot arguments (aka. command line)
bootcmd: command string executed when countdown (bootdelay) reaches zero.
The U-Boot Environment
U-Boot has two environments: the default environment, which is hardcoded in your « include/configs/<board>.h » file via macro CONFIG_EXTRA_ENV_SETTINGS and the custom environment. The default environment is compiled-in and as such is READ-ONLY. Only the custom environment is READ-WRITE.
You can always revert to the default environment using U-Boot shell command: « env default -f -a ».
Here is a must-read article about the u-boot environment.
You can read/write the environment from the U-Boot shell and from Linux. From Linux, you need to use the fw_printenv and fw_setenv program. The Yocto recipe to do so is u-boot-fw-utils.
Important:
The fw_printenv/setenv executable must be built using the same sources as the U-Boot running on the platform. I did not check the implementation of the program but I suspect it has a copy of the default environment which it uses to write to the custom environment when fw_setenv is called.
So if you’re working on both recipes (say, using the devtool) and have as a result two local checkout of your u-boot, you must ensure to keep both in sync before building your image. I have learned this the hard way…
Yocto: Standard Target Filesystem Paths Variables
The following table lists the variables used to control the directories into which files are installed.
These variables can be used directly by in recipes to refer to paths that will be used after the package is installed.
Full list in: https://git.yoctoproject.org/cgit.cgi/poky/plain/meta/conf/bitbake.conf
Variable name	Definition	        Typical value
-------------  --------------------    --------------------
prefix	        /usr                    /usr
base_prefix	(empty)	                (empty)
exec_prefix	${base_prefix}	        (empty)
base_bindir	${base_prefix}/bin	/bin
base_sbindir	${base_prefix}/sbin	/sbin
base_libdir	${base_prefix}/lib	/lib
datadir        ${prefix}/share	        /usr/share
sysconfdir	/etc	                /etc
localstatedir	/var	                /var
infodir        ${datadir}/info	        /usr/share/info
mandir         ${datadir}/man	        /usr/share/man
docdir         ${datadir}/doc	        /usr/share/doc
servicedir	/srv	                /srv
bindir         ${exec_prefix}/bin	/usr/bin
sbindir        ${exec_prefix}/sbin	/usr/sbin
libexecdir	${exec_prefix}/libexec	/usr/libexec
libdir         ${exec_prefix}/lib	/usr/lib
includedir	${exec_prefix}/include	/usr/include
palmtopdir	${libdir}/opie	        /usr/lib/opie
palmqtdir	${palmtopdir}	        /usr/lib/opie
Yocto: Miscelaneous Tips
oe-pkgdata-util
The oe-pkgdata-util tool is useful to link packages and recipes.
For example, to find out which package installs /sbin/init, you can run the following command; from the output you can see that systemd installs this file.
$oe-pkgdata-util find-path /sbin/init
$systemd: /sbin/init
oe-pkgdata-util has other useful commands; use –help to list them.
bb.utils.contains
bb.utils.contains is used in a lot of Yocto recipes. It is defined in ‘poky/bitbake/lib/bb/utils.py’.
It returns the 3rd argument if the 2nd argument can be found in the 1st, otherwise it returns the 4th argument.
def contains(variable, checkvalues, truevalue, falsevalue, d):
"""Check if a variable contains all the values specified.

Arguments:

variable -- the variable name. This will be fetched and expanded (using
d.getVar(variable)) and then split into a set().

checkvalues -- if this is a string it is split on whitespace into a set(),
otherwise coerced directly into a set().

truevalue -- the value to return if checkvalues is a subset of variable.

falsevalue -- the value to return if variable is empty or if checkvalues is
not a subset of variable.

d -- the data store.
"""
Visualizing Dependencies
bitbake -g recipe-name -u taskexp
Connecting to WIFI on Ubuntu
This article discusses how to connect to the WIFI router using wpa_supplicant and how to setup the interface to acquire an IP address using systemd-networkd.
Bring WIFI Interface up
Run ip link to find out the name of your wireless network interface.
Run ip link set dev wlan0 up to bring it up.
Join WIFI using WEP Password
Run wpa_passphrase <SSID> <password>
The SSID and password are usually printed on the side of the WIFI router.
Copy the output of the command to /etc/wpa_supplicant.conf.
Run wpa_supplicant -B -i <interface> -c /etc/wpa_supplicant.conf
Where <interface> is the name of the network interface as shown by ip link. For example wpa_supplicant -B -i wlan0 -c /etc/wpa_supplicant.conf
You should now be connected to your router over WIFI. You now need to acquire a network address.
Acquire IP Address
Assuming you’re using systemd-networkd, create file 1-wlan0.network in /etc/systemd/network with the following content:
[Match]
Name=wlan0
[Network]
DHCP=yes
This is a very simple configuration, that will acquire an IP address from the DHCP server. Refer to systemd-networkd for more information.
Now you need to restart systemd-networkd
systemctl stop systemd-networkd
systemctl daemon-reload
systemctl start systemd-networkd
Resources:
Yocto: Debugging with GDB
Build the GDB-server
Add the gdbserver tool to the target image by enabling tools-debug in EXTRA_IMAGE_FEATURES:
EXTRA_IMAGE_FEATURES += " tools-debug"
Build GDB with TUI support
GDB has a tui (Text User Interface) mode which allows to see the code, the equivalent assembly, register values, etc. By default the GDB in Yocto doesn’t build with tui support. We need to append to recipe gdb-cross to add the --enable-tui option to it.
Once this is done, we can build and install the SDK.
jp@Z:~/nxp_warrior/meta-harrier-bsp$ tree recipes-devtool/
recipes-devtool/
└── gdb
└── gdb-%.bbappend

jp@Z:~/nxp_warrior/meta-harrier-bsp$ cat recipes-devtool/gdb/gdb-%.bbappend
EXTRA_OECONF += " --enable-tui"

$ bitbake harrier-image -c populate_sdk

$ ./tmp/deploy/sdk/fsl-imx-xwayland-glibc-x86_64-harrier-image-aarch64-toolchain-4.19-warrior.sh
Start Debugging
On the target, start the application with the GDB server listening for an incoming connection on a port of your choice. The IP address is that of the target. GDB waits for a connection to start the app:
root@imx8mmevk:/usr/bin# gdbserver 192.168.100.103:1234 ./onvif_rtsp_app1234
Process ./onvif_rtsp_app created; pid = 3758
Listening on port
On the host, the SDK’s environment setup script must be sourced each time it is used in a new shell session. In my case I installed it in the default location:
$ . /opt/fsl-imx-xwayland/4.19-warrior/environment-setup-aarch64-poky-linux
Then run GDB with tui enabled:
cd ~/nxp_warrior/imx-yocto-bsp/output_harrier/tmp/work/aarch64-poky-linux/harrier-onvif/1.0-r0/image/usr/bin
$ $GDB ./onvif_rtsp_app
GNU gdb (GDB) 8.2.1
This GDB was configured as "--host=x86_64-pokysdk-linux --target=aarch64-poky-linux".
Type "show configuration" for configuration details.
Reading symbols from ./onvif_rtsp_app…done.
GDB is now running, let’s connect it to the target:
(gdb) target remote 192.168.100.103:1234
Remote debugging using 192.168.100.103:1234
Reading /lib/ld-linux-aarch64.so.1 from remote target…
warning: File transfers from remote targets can be slow. Use "set sysroot" to access files locally instead.
Reading /lib/ld-linux-aarch64.so.1 from remote target…
Reading symbols from target:/lib/ld-linux-aarch64.so.1…Reading /lib/ld-2.29.so from remote target…
Reading /lib/.debug/ld-2.29.so from remote target…
Reading /lib/.debug/ld-2.29.so from remote target…
Reading symbols from target:/lib/.debug/ld-2.29.so…done.
done.
0x0000ffffbf6d0040 in _start () from target:/lib/ld-linux-aarch64.so.1
Now GDB is connected and remote debugging the target. It however is trying to load the symbols from the target which is not very helpful. We’ll tell it to load the symbols from the host:
(gdb) set sysroot /opt/fsl-imx-xwayland/4.19-warrior/sysroots/aarch64-poky-linux/
warning: .dynamic section for "/opt/fsl-imx-xwayland/4.19-warrior/sysroots/aarch64-poky-linux/lib/ld-linux-aarch64.so.1" is not at the expected address (wrong library or version mismatch?)
Reading symbols from /opt/fsl-imx-xwayland/4.19-warrior/sysroots/aarch64-poky-linux/lib/ld-linux-aarch64.so.1…Reading symbols from /opt/fsl-imx-xwayland/4.19-warrior/sysroots/aarch64-poky-linux/lib/.debug/ld-2.29.so…done.
done.
Reading symbols from /opt/fsl-imx-xwayland/4.19-warrior/sysroots/aarch64-poky-linux/lib/ld-linux-aarch64.so.1…Reading symbols from /opt/fsl-imx-xwayland/4.19-warrior/sysroots/aarch64-poky-linux/lib/.debug/ld-2.29.so…done.
done.
(gdb)
Now we can set a break-point in main() and continue. The program will pause when it enters main().
(gdb) break main
(gdb) c
A UVC camera based on an FTDI FT602 device controlled over a Virtual COM port driver
We used the FT602 to create an adapter board converting a SONY (or Tamron) block camera to UVC, running over USB3. Those cameras have a proprietary 7:1LVDS interface for the video and a serial port for control. When combined with our board, the resulting camera behaves like a standard UVC camera able to stream up to 1080p60 video and be controlled over the same USB cable.
An FPGA receives the 7:1LVDS input signal from the camera and pipes it to the FT602 input FIFO. The chip in turns, sends it as a UVC stream down the wire. The FPGA also implement a UART to control the camera.
Even though the chip is meant to take care of the USB/UVC implementation it is useful to have a bit of background about the USB standard. The following website provides an excellent walk-through: https://www.beyondlogic.org/usbnutshell/usb1.shtml
Video Streaming
The FT602 chip implements the UVC standard so the board worked without problem with Microsoft Media Foundation and DirectShow and under Linux with GStreamer.
We implemented support for UVC properties to control things like zoom, focus, etc. over the standard-defined UVC properties. Under Windows, this can be used via IAMVideoProcAmp or IAMCameraControl.
Virtual COM Port Driver (UMDF)
The SONY or Tamron block cameras offer a lot more control than is available via the standard UVC properties. Typically, there’s around 100 different features that can be tweaked. Plus our own board also has registers that we want to control from the host; we decided to use VISCA commands to control our own registers, the same protocol used by the cameras.
On Windows, the camera manufacturers provide host programs with a GUI to control all the features of their camera over a COM port; all the user has to do is select the host COM port to use. So we decided to implement a Windows Virtual COM port driver to provide comms to the camera via our board and be able to use those programs.
The cameras use the VISCA protocol for control, which is a very simple packet-based protocol. Each packet is 16 bytes long max and request are always followed by an ack.
I developed a UMDF1.0 driver as this meant our code runs in user-mode and I used v1.0 of the framework so I could write in C++. In retrospect, this was not a good choice. Microsoft has deprecated v1.0 for v2.0 and I could have written my code in C++ in a separate DLL; by the time I realised this, it was too late.
Info about WDF queues: https://www.osr.com/nt-insider/2011-issue2/basics-wdf-queues/
An interesting approach for Linux: https://www.itdev.co.uk/blog/emulating-serial-port-unix
Comms over USB – The problematic part…
The FT602 chip has an I2C block that we used to interface with our FPGA. In the FPGA, we hooked our registers and some FIFOs to the I2C to send and receive the VISCA commands. Nothing too strenuous here.
FTDI provides an API to read and write the I2C bus in ft602.dll. This uses winusb.sys to communicate with the device. The API is not well documented, and a number of function don’t work. FTDI’s tech support was inexistent, plus they refused to provide source code, great…
It wasn’t too hard to get the comms to work but we ran into trouble when we realised that reading and writing the I2C registers caused the video stream to be interrupted! This was particularly bad at 1080p60 where the stream would stop completely on some machines!
The main issue was that we did not manage to use the USB interrupt supported by the FT602 chip. The FTDI documentation could be summed-up as « There is an interrupt line, it’s active low. »!
As a result the driver had to poll the RX FIFO in our FPGA to know when there was something to read. Even polling at 2 sec intervals had an effect on the video stream!
FTDI tech support did look into the problem and came back with « Yeah, ahem, it don’t work, so don’t use it », or something like that!
After much experimenting we found out that the interrupt line into the FT602 is edge triggered! So our FPGA has to keep on toggling the line until the host software clears the interrupt.
The FT602.dll calls a user-provided callback when an interrupt occurs and the FTDI example shows that the callback should make whatever I2C accesses needed to service the interrupt. Well, I found the hard way that making ANY I2C access from the callback does not work – it does not fail, but it does NOTHING!
So I had to use a separate thread to service the interrupt, and a cond_var, released from the I2C callback.
Generating Call Stack Trace
The code below is Windows-specific and generates a stack trace programmatically.
Code nicked from this article: http://blog.aaronballman.com/2011/04/generating-a-stack-crawl/
static bool GetStackWalk( std::string &outWalk ){// Set up the symbol options so that we can gather information from the current// executable's PDB files, as well as the Microsoft symbol servers. We also want// to undecorate the symbol names we're returned. If you want, you can add other// symbol servers or paths via a semi-colon separated list in SymInitialized.::SymSetOptions( SYMOPT_DEFERRED_LOADS | SYMOPT_INCLUDE_32BIT_MODULES | SYMOPT_UNDNAME );if (!::SymInitialize( ::GetCurrentProcess(), "http://msdl.microsoft.com/download/symbols", TRUE )) return false;// Capture up to 25 stack frames from the current call stack. We're going to// skip the first stack frame returned because that's the GetStackWalk function// itself, which we don't care about.PVOID addrs[ 25 ] = { 0 };USHORT frames = CaptureStackBackTrace( 1, 25, addrs, NULL );for (USHORT i = 0; i < frames; i++) {// Allocate a buffer large enough to hold the symbol information on the stack and get // a pointer to the buffer. We also have to set the size of the symbol structure itself// and the number of bytes reserved for the name.ULONG64 buffer[ (sizeof( SYMBOL_INFO ) + 1024 + sizeof( ULONG64 ) - 1) / sizeof( ULONG64 ) ] = { 0 };SYMBOL_INFO *info = (SYMBOL_INFO *)buffer;info->SizeOfStruct = sizeof( SYMBOL_INFO );info->MaxNameLen = 1024;// Attempt to get information about the symbol and add it to our output parameter.DWORD64 displacement = 0;if (::SymFromAddr( ::GetCurrentProcess(), (DWORD64)addrs[ i ], &displacement, info )) {outWalk.append( info->Name, info->NameLen );outWalk.append( "\n" );}}::SymCleanup( ::GetCurrentProcess() );return true;}